| Smoke Testing | Sanity Testing |
| Used for check local critical functionalities of a software | Focus will be on a particular area or minor functionalities |
| Performed to check stability | Used to verify the rationality |
| Both manual and automation test cases can be used | Generally, sanity testing does not have test scripts or test cases |
| Usually performed before passing the build to testing team | Executed before UAT and regression |
| Carried over by developers | Performed by testers |
| Subset of acceptance testing | Subset of regression testing |
Testing
VS Code C# – System.NotSupportedException: No data is available for encoding 1252
If you are moving from the .Net framework to .Net core, you may come across many issues.
Especially if you are reading something from excel you may get below issue somewhere around the process.
“No data is available for encoding 1252. For information on defining a custom encoding, see the documentation for the Encoding.RegisterProvider method.”
This happens due to the encoding difference in .Net core.
This issue can be easily be fixed by adding the below line of code in your excel handling methods.
System.Text.Encoding.RegisterProvider(System.Text.CodePagesEncodingProvider.Instance);Don’t forget to add the corresponding NuGet package also.
So while excel reading may look like this.
System.Text.Encoding.RegisterProvider(System.Text.CodePagesEncodingProvider.Instance);

FileStream stream = File.Open(ExcelRepFile, FileMode.Open, FileAccess.Read);

IExcelDataReader excelReader = null;
try
{
	if (ExcelRepFile.EndsWith(".xls"))
	{
		excelReader = ExcelReaderFactory.CreateBinaryReader(stream);
	}
	if (ExcelRepFile.EndsWith(".xlsx"))
	{
		excelReader = ExcelReaderFactory.CreateOpenXmlReader(stream);
	}

}
catch (Exception)
{
	throw;
}
Thanks for reading How to fix “No data is available for encoding 1252” error with ExcelReaderFactory in .Net Core
Data driven testing in C# with NUnit and RestSharp
For those of you that do not know what I mean with ‘data driven’: when I want to run tests that exercise the same logic or flow in my application under test multiple times with various combinations of input values and corresponding expected outcomes, I call that data driven testing.
This is especially useful when testing RESTful APIs, since these are all about sending and receiving data as well as exposing business logic to other layers in an application architecture (such as a graphical user interface) or to other applications (consumers of the API).
As a starting point, consider these three tests, written using RestSharp and NUnit:
[TestFixture]
public class NonDataDrivenTests
{
    private const string BASE_URL = "http://api.zippopotam.us";

    [Test]
    public void RetrieveDataForUs90210_ShouldYieldBeverlyHills()
    {
        // arrange
        RestClient client = new RestClient(BASE_URL);
        RestRequest request =
            new RestRequest("us/90210", Method.GET);

        // act
        IRestResponse response = client.Execute(request);
        LocationResponse locationResponse =
            new JsonDeserializer().
            Deserialize<LocationResponse>(response);

        // assert
        Assert.That(
            locationResponse.Places[0].PlaceName,
            Is.EqualTo("Beverly Hills")
        );
    }

    [Test]
    public void RetrieveDataForUs12345_ShouldYieldSchenectady()
    {
        // arrange
        RestClient client = new RestClient(BASE_URL);
        RestRequest request =
            new RestRequest("us/12345", Method.GET);

        // act
        IRestResponse response = client.Execute(request);
        LocationResponse locationResponse =
            new JsonDeserializer().
            Deserialize<LocationResponse>(response);

        // assert
        Assert.That(
            locationResponse.Places[0].PlaceName,
            Is.EqualTo("Schenectady")
        );
    }

    [Test]
    public void RetrieveDataForCaY1A_ShouldYieldWhiteHorse()
    {
        // arrange
        RestClient client = new RestClient(BASE_URL);
        RestRequest request =
            new RestRequest("ca/Y1A", Method.GET);

        // act
        IRestResponse response = client.Execute(request);
        LocationResponse locationResponse =
            new JsonDeserializer().
            Deserialize<LocationResponse>(response);

        // assert
        Assert.That(
            locationResponse.Places[0].PlaceName,
            Is.EqualTo("Whitehorse")
        );
    }
}
Please note that the LocationResponse type is a custom type I defined myself, see the GitHub repository for this post for its implementation.
These tests are a good example of what I wrote about earlier: I’m invoking the same logic (retrieving location data based on a country and zip code and then verifiying the corresponding place name from the API response) three times with different sets of test data.
This quickly gets very inefficient when you add more tests / more test data combinations, resulting in a lot of duplicated code. Luckily, NUnit provides several ways to make these tests data driven. Let’s look at two of them in some more detail.
Using the [TestCase] attribute
The first way to create data driven tests is by using the [TestCase] attribute that NUnit provides. You can add multiple [TestCase] attributes for a single test method, and specify the combinations of input and expected output parameters that the test method should take.
Additionally, you can specify other characteristics for the individual test cases. One of the most useful ones is the TestName property, which can be used to provide a legible and useful name for the individual test case. This name also turns up in the reporting, so I highly advise you to take the effort to specify one.
Here’s what our code looks like when we refactor it to use the [TestCase] attribute:
[TestFixture]
public class DataDrivenUsingAttributesTests
{
    private const string BASE_URL = "http://api.zippopotam.us";

    [TestCase("us", "90210", "Beverly Hills", TestName = "Check that US zipcode 90210 yields Beverly Hills")]
    [TestCase("us", "12345", "Schenectady", TestName = "Check that US zipcode 12345 yields Schenectady")]
    [TestCase("ca", "Y1A", "Whitehorse", TestName = "Check that CA zipcode Y1A yields Whitehorse")]
    public void RetrieveDataFor_ShouldYield
        (string countryCode, string zipCode, string expectedPlaceName)
    {
        // arrange
        RestClient client = new RestClient(BASE_URL);
        RestRequest request =
            new RestRequest($"{countryCode}/{zipCode}", Method.GET);

        // act
        IRestResponse response = client.Execute(request);
        LocationResponse locationResponse =
            new JsonDeserializer().
            Deserialize<LocationResponse>(response);

        // assert
        Assert.That(
            locationResponse.Places[0].PlaceName,
            Is.EqualTo(expectedPlaceName)
        );
    }
}
Much better! We now only have to define our test logic once, and NUnit takes care of iterating over the values defined in the [TestCase] attributes:

There are some downsides to using the [TestCase] attributes, though:
- It’s all good when you just want to run a small amount of test iterations, but when you want to / have to test for larger numbers of combinations of input and output parameters, your code quickly gets messy (on a side note, if this is the case for you, try looking into property-based testing instead of the example-based testing we’re doing here).
- You still have to hard code your test data in your code, which might give problems with scaling and maintaining your tests in the future.
This is where the [TestCaseSource] attribute comes in.
Using the [TestCaseSource] attribute
If you want to or need to work with larger numbers of combinations of test data and/or you want to be able to specify your test data outside of your test class, then using [TestCaseSource] might be a useful option to explore.
In this approach, you specify or read the test data in a separate method, which is then passed to the original test method. NUnit will take care of iterating over the different combinations of test data returned by the method that delivers the test data.
Here’s an example of how to apply [TestCaseSource] to our tests:
[TestFixture]
public class DataDrivenUsingTestCaseSourceTests
{
    private const string BASE_URL = "http://api.zippopotam.us";

    [Test, TestCaseSource("LocationTestData")]
    public void RetrieveDataFor_ShouldYield
        (string countryCode, string zipCode, string expectedPlaceName)
    {
        // arrange
        RestClient client = new RestClient(BASE_URL);
        RestRequest request =
            new RestRequest($"{countryCode}/{zipCode}", Method.GET);

        // act
        IRestResponse response = client.Execute(request);
        LocationResponse locationResponse =
            new JsonDeserializer().
            Deserialize<LocationResponse>(response);

        // assert
        Assert.That(
            locationResponse.Places[0].PlaceName,
            Is.EqualTo(expectedPlaceName)
        );
    }

    private static IEnumerable<TestCaseData> LocationTestData()
    {
        yield return new TestCaseData("us", "90210", "Beverly Hills").
            SetName("Check that US zipcode 90210 yields Beverly Hills");
        yield return new TestCaseData("us", "12345", "Schenectady").
            SetName("Check that US zipcode 12345 yields Schenectady");
        yield return new TestCaseData("ca", "Y1A", "Whitehorse").
            SetName("Check that CA zipcode Y1A yields Whitehorse");
    }
}
In this example, we specify our test data in a separate method LocationTestData(), and then tell the test method to use that method as the test data source using the [TestDataSource] attribute, which takes as its argument the name of the test data method.
For clarity, the test data is still hard coded in the body of the LocationTestData() method, but that’s not mandatory. You could just as easily write a method that reads the test data from any external source, as long as the test data method is static and returns an object of type IEnumerable, or any object that implements this interface.
Also, since the [TestCase] and [TestCaseSource] attributes are features of NUnit, and not of RestSharp, you can apply the principles illustrated in this post to other types of tests just as well.
Beware, though, before you use them for user interface-driven testing with tools like Selenium WebDriver. Chances are that you’re falling for a classic case of ‘just because you can, doesn’t mean you should’. I find data driven testing with Selenium WebDriver to be a test code smell: if you’re going through the same screen flow multiple times, and the only variation is in the test data, there’s a high chance that there’s a more efficient way to test the same underlying business logic (for example by leveraging APIs).
Sanity Testing Vs Smoke Testing: Introduction & Differences
Smoke and Sanity testing are the most misunderstood topics in Software Testing. There is an enormous amount of literature on the subject, but most of them are confusing. The following article makes an attempt to address the confusion.
The key differences between Smoke and Sanity Testing can be learned with the help of the following diagram –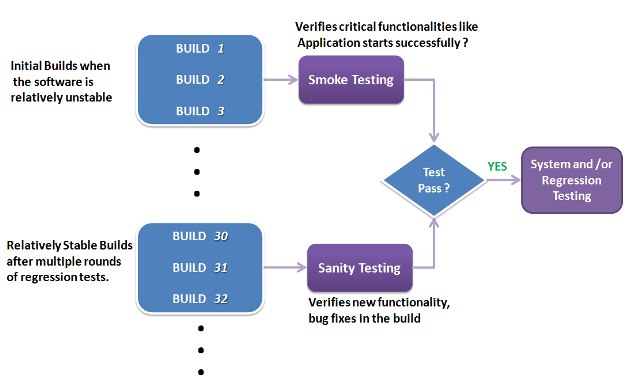
To appreciate the above diagram lets first understand –
What is a Software Build?
If you are developing a simple computer program which consists of only one source code file, you merely need to compile and link this one file, to produce an executable file. This process is very simple.
Usually, this is not the case. A typical Software Project consists of hundreds or even thousands of source code files. Creating an executable program from these source files is a complicated and time-consuming task.
You need to use “build” software to create an executable program and the process is called ” Software Build”
What is Smoke Testing?
Smoke Testing is a kind of Software Testing performed after software build to ascertain that the critical functionalities of the program are working fine. It is executed “before” any detailed functional or regression tests are executed on the software build. The purpose is to reject a badly broken application so that the QA team does not waste time installing and testing the software application.
In Smoke Testing, the test cases chose to cover the most important functionality or component of the system. The objective is not to perform exhaustive testing, but to verify that the critical functionalities of the system are working fine.
For Example, a typical smoke test would be – Verify that the application launches successfully, Check that the GUI is responsive … etc.
What is Sanity Testing?
Sanity testing is a kind of Software Testing performed after receiving a software build, with minor changes in code, or functionality, to ascertain that the bugs have been fixed and no further issues are introduced due to these changes. The goal is to determine that the proposed functionality works roughly as expected. If sanity test fails, the build is rejected to save the time and costs involved in a more rigorous testing.
The objective is “not” to verify thoroughly the new functionality but to determine that the developer has applied some rationality (sanity) while producing the software. For instance, if your scientific calculator gives the result of 2 + 2 =5! Then, there is no point testing the advanced functionalities like sin 30 + cos 50.
Smoke Testing Vs Sanity Testing – Key Differences
| Smoke Testing | Sanity Testing |
|---|---|
| Smoke Testing is performed to ascertain that the critical functionalities of the program is working fine | Sanity Testing is done to check the new functionality/bugs have been fixed |
| The objective of this testing is to verify the “stability” of the system in order to proceed with more rigorous testing | The objective of the testing is to verify the “rationality” of the system in order to proceed with more rigorous testing |
| This testing is performed by the developers or testers | Sanity testing is usually performed by testers |
| Smoke testing is usually documented or scripted | Sanity testing is usually not documented and is unscripted |
| Smoke testing is a subset of Acceptance testing | Sanity testing is a subset of Regression Testing |
| Smoke testing exercises the entire system from end to end | Sanity testing exercises only the particular component of the entire system |
| Smoke testing is like General Health Check Up | Sanity Testing is like specialized health check up |
Points to note.
- Both sanity tests and smoke tests are ways to avoid wasting time and effort by quickly determining whether an application is too flawed to merit any rigorous testing.
- Sanity Testing is also called tester acceptance testing.
- Smoke testing performed on a particular build is also known as a build verification test.
- One of the best industry practice is to conduct a Daily build and smoke test in software projects.
- Both smoke and sanity tests can be executed manually or using an automation tool. When automated tools are used, the tests are often initiated by the same process that generates the build itself.
- As per the needs of testing, you may have to execute both Sanity and Smoke Tests in the software build. In such cases, you will first execute Smoke tests and then go ahead with Sanity Testing. In industry, test cases for Sanity Testing are commonly combined with that for smoke tests, to speed up test execution. Hence, it’s a common that the terms are often confused and used interchangeably.
Read more about Smoke Testing in software engineering
KEY DIFFERENCE
- Smoke Testing has a goal to verify “stability” whereas Sanity Testing has a goal to verify “rationality”.
- Smoke Testing is done by both developers or testers whereas Sanity Testing is done by testers.
- Smoke Testing verifies the critical functionalities of the system whereas Sanity Testing verifies the new functionality like bug fixes.
- Smoke testing is a subset of acceptance testing whereas Sanity testing is a subset of Regression Testing.
- Smoke testing is documented or scripted whereas Sanity testing isn’t.
- Smoke testing verifies the entire system from end to end whereas Sanity Testing verifies only a particular component.
What is Integration Testing?
Integration testing tests integration or interfaces between components, interactions to different parts of the system such as an operating system, file system and hardware or interfaces between systems.
- Also after integrating two different components together we do the integration testing. As displayed in the image below when two different modules ‘Module A’ and ‘Module B’ are integrated then the integration testing is done.

- Integration testing is done by a specific integration tester or test team.
- Integration testing follows two approach known as ‘Top Down’ approach and ‘Bottom Up’ approach as shown in the image below:

Below are the integration testing techniques:
1. Big Bang integration testing:
In Big Bang integration testing all components or modules are integrated simultaneously, after which everything is tested as a whole. As per the below image all the modules from ‘Module 1’ to ‘Module 6’ are integrated simultaneously then the testing is carried out. 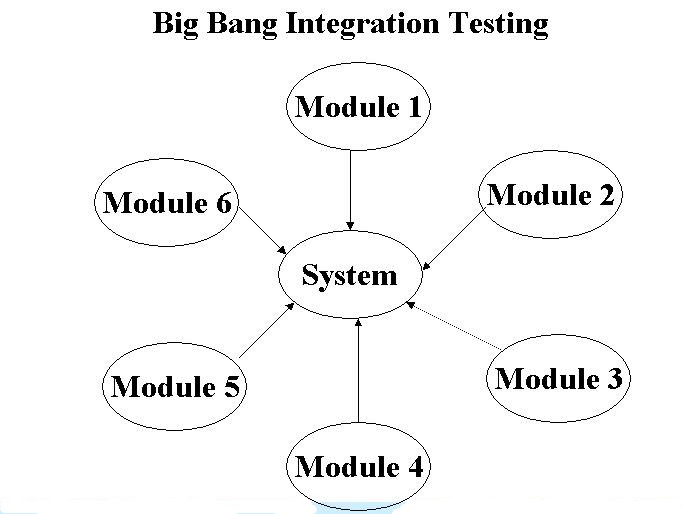
Advantage: Big Bang testing has the advantage that everything is finished before integration testing starts.
Disadvantage: The major disadvantage is that in general it is time consuming and difficult to trace the cause of failures because of this late integration.
2. Top-down integration testing: Testing takes place from top to bottom, following the control flow or architectural structure (e.g. starting from the GUI or main menu). Components or systems are substituted by stubs. Below is the diagram of ‘Top down Approach’:
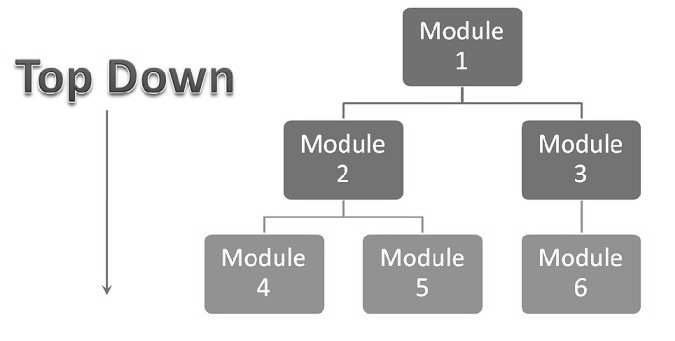
Advantages of Top-Down approach:
- The tested product is very consistent because the integration testing is basically performed in an environment that almost similar to that of reality
- Stubs can be written with lesser time because when compared to the drivers then Stubs are simpler to author.
Disadvantages of Top-Down approach:
- Basic functionality is tested at the end of cycle
3. Bottom-up integration testing: Testing takes place from the bottom of the control flow upwards. Components or systems are substituted by drivers. Below is the image of ‘Bottom up approach’:
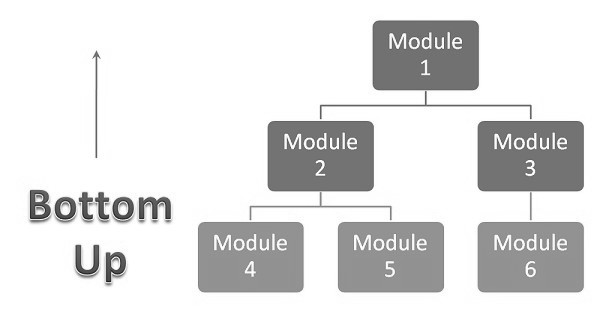
Advantage of Bottom-Up approach:
- In this approach development and testing can be done together so that the product or application will be efficient and as per the customer specifications.
Disadvantages of Bottom-Up approach:
- We can catch the Key interface defects at the end of cycle
- It is required to create the test drivers for modules at all levels except the top control
- Another extreme is that all programmers are integrated one by one, and a test is carried out after each step.
- The incremental approach has the advantage that the defects are found early in a smaller assembly when it is relatively easy to detect the cause.
- A disadvantage is that it can be time-consuming since stubs and drivers have to be developed and used in the test.
- Within incremental integration testing a range of possibilities exist, partly depending on the system architecture.
Functional incremental: Integration and testing takes place on the basis of the functions and functionalities, as documented in the functional specification.
What is Black Box Testing?
Black box testing treats the system as a “black-box”, so it doesn’t explicitly use Knowledge of the internal structure or code. Or in other words the Test engineer need not know the internal working of the “Black box” or application.
Main focus in black box testing is on functionality of the system as a whole. The term ‘behavioral testing’ is also used for black box testing and white box testing is also sometimes called ‘structural testing’. Behavioral test design is slightly different from black-box test design because the use of internal knowledge isn’t strictly forbidden, but it’s still discouraged.
Each testing method has its own advantages and disadvantages. There are some bugs that cannot be found using only black box or only white box. Majority of the applications are tested by black box testing method. We need to cover majority of test cases so that most of the bugs will get discovered by blackbox testing.
Black box testing occurs throughout the software development and Testing life cycle i.e in Unit, Integration, System, Acceptance and regression testing stages.
Tools used for Black Box testing:
Black box testing tools are mainly record and playback tools. These tools are used for regression testing that to check whether new build has created any bug in previous working application functionality. These record and playback tools records test cases in the form of some scripts like TSL, VB script, Java script, Perl.
Advantages of Black Box Testing
– Tester can be non-technical.
– Used to verify contradictions in actual system and the specifications.
– Test cases can be designed as soon as the functional specifications are complete
Disadvantages of Black Box Testing
– The test inputs needs to be from large sample space.
– It is difficult to identify all possible inputs in limited testing time. So writing test cases is slow and difficult
– Chances of having unidentified paths during this testing
Methods of Black box Testing : –
Graph Based Testing Methods:
Each and every application is build up of some objects. All such objects are identified and graph is prepared. From this object graph each object relationship is identified and test cases written accordingly to discover the errors.
Error Guessing:
This is purely based on previous experience and judgment of tester. Error Guessing is the art of guessing where errors can be hidden. For this technique there are no specific tools, writing the test cases that cover all the application paths.
Boundary Value Analysis:
Many systems have tendency to fail on boundary. So testing boundry values of application is important. Boundary Value Analysis (BVA) is a test Functional Testing technique where the extreme boundary values are chosen. Boundary values include maximum, minimum, just inside/outside boundaries, typical values, and error values.
Extends equivalence partitioning
Test both sides of each boundary
Look at output boundaries for test cases too
Test min, min-1, max, max+1, typical values
BVA techniques:
1. Number of variables
For n variables: BVA yields 4n + 1 test cases.
2. Kinds of ranges
Generalizing ranges depends on the nature or type of variables
Advantages of Boundary Value Analysis
1. Robustness Testing – Boundary Value Analysis plus values that go beyond the limits
2. Min – 1, Min, Min +1, Nom, Max -1, Max, Max +1
3. Forces attention to exception handling
Limitations of Boundary Value Analysis
Boundary value testing is efficient only for variables of fixed values i.e boundary.
Equivalence Partitioning:
Equivalence partitioning is a black box testing method that divides the input domain of a program into classes of data from which test cases can be derived.
How is this partitioning performed while testing:
1. If an input condition specifies a range, one valid and one two invalid classes are defined.
2. If an input condition requires a specific value, one valid and two invalid equivalence classes are defined.
3. If an input condition specifies a member of a set, one valid and one invalid equivalence class is defined.
4. If an input condition is Boolean, one valid and one invalid class is defined.
What is Regression Testing?
Regression testing is type of testing carried out to ensure that changes made in the fixes or any enhancement changes are not impacting the previously working functionality. It is executed after enhancement or defect fixes in the software or its environment. It can be difficult to determine how much re-testing is needed, especially near the end of the development cycle.
This testing is done to make sure that new code changes should not have side effects on the existing functionalities. It ensures that old code still works once the new code changes are done.
Need of Regression Testing
Regression Testing is required when there is a
- Change in requirements and code is modified according to the requirement
- New feature is added to the software
- Defect fixing
- Performance issue fix
Regression Testing Techniques
Software maintenance is an activity which includes enhancements, error corrections, optimization and deletion of existing features. These modifications may cause the system to work incorrectly. Therefore, Regression Testing becomes necessary. Regression Testing can be carried out using following techniques:

Retest All
- This is one of the methods for regression testing in which all the tests in the existing test bucket or suite should be re-executed. This is very expensive as it requires huge time and resources.
Regression Test Selection
- Instead of re-executing the entire test suite, it is better to select part of test suite to be run
- Test cases selected can be categorized as 1) Reusable Test Cases 2) Obsolete Test Cases.
- Re-usable Test cases can be used in succeeding regression cycles.
- Obsolete Test Cases can’t be used in succeeding cycles.
Prioritization of Test Cases
- Prioritize the test cases depending on business impact, critical & frequently used functionalities. Selection of test cases based on priority will greatly reduce the regression test suite.
Selecting test cases for regression testing
It was found from industry data that good number of the defects reported by customers were due to last minute bug fixes creating side effects and hence selecting the test case for regression testing is an art and not that easy. Effective Regression Tests can be done by selecting following test cases –
- Test cases which have frequent defects
- Functionalities which are more visible to the users
- Test cases which verify core features of the product
- Test cases of Functionalities which has undergone more and recent changes
- All Integration Test Cases
- All Complex Test Cases
- Boundary value test cases
- Sample of Successful test cases
- Sample of Failure test cases
This type of testing typically carried out by testing specialist peoples. The automated testing methods are the best and safe option to carry out the Regression testing. In the market there are many free as well as free (open source) software testing tools are available. In the larger software development project the Regression testing is commonly used.
Some of the most commonly used regression testing tools list:
- QTP
- Regression Tester
- Selenium
- Rational Functional Tester
- Watir
- Winrunner
- actiWate
- AdventNet QEngine
- SilkTest
- vTest
It is a verification method & mainly done in system testing but it applicable to all levels of software testing (Unit testing, Integration testing, System testing and Acceptance testing.)
Regression Testing and Configuration Management
Configuration Management during Regression Testing becomes imperative in Agile Environments where code is being continuously modified. To ensure effective regression tests, observe the following :
- Code being regression tested should be under a configuration management tool
- No changes must be allowed to code, during the regression test phase. Regression test code must be kept immune to developer changes.
- The database used for regression testing must be isolated. No database changes must be allowed
Difference between Re-Testing and Regression Testing:
Retesting means testing the functionality or bug again to ensure the code is fixed. If it is not fixed, defect needs to be re-opened. If fixed, defect is closed.
Regression testing means testing your software application when it undergoes a code change to ensure that the new code has not affected other parts of the software.
How to define the scope of regression testing?
The scope of testing is based on the how large fixes or enhancements of features. If this is impacting in the larger area of the application then scope will increase proportionally & it requires the deep testing of application including relevant test cases execution. But to analyze this tester should get the correct inputs from developer to decide the scope.
But if you are testing GUI applications the doing regression testing is very difficult. If the changes made in the GUI then all test cases written will not reused. In case if the project is big then it is very hectic work to update the GUI test cases. You have to write it again different test case for updated GUI once again.
What is Functional Testing?
Functional testing is a type of testing which verifies that each function of the software application operates in conformance with the requirement specification. This testing mainly involves black box testing and it is not concerned about the source code of the application.
Each and every functionality of the system is tested by providing appropriate input, verifying the output and comparing the actual results with the expected results. This testing involves checking of User Interface, APIs, Database, security, client/ server applications and functionality of the Application Under Test. The testing can be done either manually or using automation
What do you test in Functional Testing?
The prime objective of Functional testing is checking the functionalities of the software system. It mainly concentrates on –
- Mainline functions: Testing the main functions of an application
- Basic Usability: It involves basic usability testing of the system. It checks whether an user can freely navigate through the screens without any difficulties.
- Accessibility: Checks the accessibility of the system for the user
- Error Conditions: Usage of testing techniques to check for error conditions. It checks whether suitable error messages are displayed.
Functional Testing Process:
In order to functionally test an application, following steps must be observed.

- Understand the Requirements
- Identify test input (test data)
- Compute the expected outcomes with the selected test input values
- Execute test cases
- Comparison of actual and computed expected result
Functional Vs Non-Functional Testing:
| Functional Testing | Non-Functional Testing |
|---|---|
| Functional testing is performed using the functional specification provided by the client and verifies the system against the functional requirements. | Non-Functional testing checks the Performance, reliability, scalability and other non-functional aspects of the software system. |
| Functional testing is executed first | Non functional testing should be performed after functional testing |
| Manual testing or automation tools can be used for functional testing | Using tools will be effective for this testing |
| Business requirements are the inputs to functional testing | Performance parameters like speed , scalability are inputs to non-functional testing. |
| Functional testing describes what the product does | Nonfunctional testing describes how good the product works |
| Easy to do manual testing | Tough to do manual testing |
Types of Functional testing are
|
Types of Non functional testing are
|
Functional testing tools:
There are several tools available in the marker to perform functional testing. They are explained as follows:
- Selenium – Popular Open Source Functional Testing Tool
- QTP – Very user-friendly Functional Test tool by HP
- JUnit– Used mainly for Java applications and this can be used in Unit and system testing
- soapUI – This is an open source functional testing tool, mainly used for Web service testing. It supports multiple protocols such HTTP, SOAP and JDBC.
- Watir – This is functional testing tool for web applications. It supports tests executed at the web browser and uses ruby scripting language
What is Unit Testing?
Unit testing of software applications is done during the development (coding) of an application.
The objective of unit testing is to isolate a section of code and verify its correctness. In procedural programming a unit may be an individual function or procedure
The goal of unit testing is to isolate each part of the program and show that the individual parts are correct. Unit testing is usually performed by the developer.
Why do Unit Testing? Why it is important?
Sometimes software developers attempt to save time by doing minimal unit testing. This is a myth because skimping on unit testing leads to higher defect fixing costs during system testing, integration testing and even beta testing after the application is completed. Proper unit testing done during the development stage saves both time and money in the end.
How to Create Unit Test Cases
Unit testing is commonly automated, but may still be performed manually. The IEEE does not favor one over the other. A manual approach to unit testing may employ a step-by-step instructional document.
Under the automated approach-
- A developer could write another section of code in the application just to test the function. They would later comment out and finally remove the test code when the application is done.
- They could also isolate the function to test it more rigorously. This is a more thorough unit testing practice that involves copy and pasting the function to its own testing environment to other than its natural environment. Isolating the code helps in revealing unnecessary dependencies between the code being tested and other units or data spaces in the product. These dependencies can then be eliminated.
A coder may use a UnitTest Framework to develop automated test cases. Using an automation framework, the developer codes criteria into the test to verify the correctness of the unit. During execution of the test cases, the framework logs those that fail any criterion. Many frameworks will also automatically flag and report in a summary these failed test cases. Depending upon the severity of a failure, the framework may halt subsequent testing.
Mock Objects
Unit testing relies on mock objects being created to test sections of code that are not yet part of a complete application. Mock objects fill in for the missing parts of the program. For example, you might have a function that needs variables or objects that are not created yet. In unit testing, those will be accounted for in the form of mock objects created solely for the purpose of the unit testing done on that section of code.
Unit Testing Tools
There are several automated tools available to assist with unit testing. We will provide a few examples below:
- Rational Software – Rational Software by IBM has a unittest feature known as “Rational Test Realtime”. The software contains a complete range of testing tools for much more than just unit testing. It is used for Ada, Java, C and C++. It creates unit tests by reverse engineering the software. Operating systems it supports include Windows, Linux, Solaris, HP-UX and AIX. Go to http://www-01.ibm.com/software/rational/ to learn more.
- JavaScript Assertion Unit- Also known as jsAsserUnit, this Freeware JavaScript unit testing tool can be used on any platform that supports JavaScript. It is available at http://jsassertunit.sourceforge.net/docs/index.html
- CUT – CUT is a Freeware unittest tool for C, C++ and Objective C. It is great for embedded software testing frameworks and desktop applications on Linux and Windows operating systems. Learn more at sourceforge.net by going to http://sourceforge.net/projects/cut/.
- Dotunit – Dotunit is a .net framework Freeware unit testing tool. Part of Junit on the Microsoft .net framework, Dotunit is used for automating unit testing on windows systems. This is another tool from sourceforge.net, so look for it at: http://dotunit.sourceforge.net/
Those are just a few of the available unit testing tools. There are lots more, especially for C languages and Java, but you are sure to find a unit testing tool for your programming needs regardless of the language you use.
Extreme Programming & Unit Testing
Unit testing in Extreme Programming involves the extensive use of testing frameworks. A unit test framework is used in order to create automated unit tests. Unit testing frameworks are not unique to extreme programming, but they are essential to it. Below we look at some of what extreme programming brings to the world of unit testing:
- Tests are written before the code
- Rely heavily on testing frameworks
- All classes in the applications are tested
- Quick and easy integration is made possible
Unit Testing Myth
Myth: It requires time and I am always overscheduled
My code is rock solid! I do not need unit tests.
Myths by their very nature are false assumptions. These assumptions lead to a vicious cycle as follows –

Truth is Unit testing increase the speed of development.
Programmers think that integration testing will catch all errors and do not unit test. Once units are integrated, very simple errors which could have very easily found and fixed in unit tested take very long time to be traced and fixed.
Unit Testing Benefits and Advantage
- Developers looking to learn what functionality is provided by a unit and how to use it can look at the unit tests to gain a basic understanding of the unit API.
- Unit testing allows the programmer to refactor code at a later date, and make sure the module still works correctly (i.e. Regression testing). The procedure is to write test cases for all functions and methods so that whenever a change causes a fault, it can be quickly identified and fixed.
- Due to the modular nature of the unit testing, we can tests parts of project without waiting for others to be completed.
Unit Testing Limitations
- Unit testing can’t be expected to catch every error in a program. It is not possible to evaluate all execution paths even in the most trivial programs
- Unit testing by its very nature focuses on a unit of code. Hence it can’t catch integration errors or broad system level errors.
It’s recommended unit testing be used in conjunction with other testing activities.
Unit Testing Techniques
- Structural Techniques
- Functional Testing Techniques
- Error Based Techniques
Unit Testing Best Practices
- Unit Test cases should be independent. In case of any enhancements or change in requirements, unit test cases should not be affected.
- Test only one code at a time.
- Follow clear and consistent naming conventions for your unit tests
- In case of change in code in any module, ensure there is a corresponding unit test case for the module and the module passes the tests before changing the implementation
- Bugs identified during unit testing must be fixed before proceeding to the next phase in SDLC
- Adopt a “test as your code” approach. The more code you write without testing the more paths you have to check for errors.

Summary
As you can see, there can be a lot involved in unit testing. It can be complex or rather simple depending on the application being tested and the testing strategies, tools and philosophies used. Unit testing is always necessary on some level. That is a certainty.
Difference between Bug, Defect and Error
Bug:
An Error found in the development environment before the product is shipped to the customer.
An Error found in the development environment before the product is shipped to the customer.
Bug: Simply Bug is an error found BEFORE the application goes into production. A programming error that causes a program to work poorly, produce incorrect results, or crash. An error in software or hardware that causes a program to malfunction.
